Contouring is a makeup technique that allows you to correct the relief of your face, distract attention from its shortcomings and emphasize its advantages.
Believe me, if you choose the perfect corrector, you may not even need foundation: it will be enough to precisely apply the correctly selected corrector. How not to make a mistake with your choice? Take our test and find out which best-selling concealer is perfect for you.
Take the test
- For example, with the help of contouring, you can visually lengthen or, conversely, shorten your nose, make your face more symmetrical, highlight your cheekbones, narrow your face, and even remove a “double chin.”
- It is noteworthy that achieving such amazing results is very simple: just learn how to correctly alternate dark and light shades of foundation.
© Makeup.ru
The canonical contouring “from Kim Kardashian” consists of as many as 50 stages, but the “light” version will require much less time, effort and cosmetics from you. And the result will be no worse. Let's figure out how to do proper facial sculpting.
Find your perfect L'Oréal Paris shade
View all services
Dry or creamy? Choosing facial contouring products
There are two main types of facial contouring: the first is created with products with a dry texture, the second with creamy textures. What is the difference?
Dry contouring
As the name implies, this sculpting is done using dry products - blush or powder. They are usually applied with brushes. Powder products are most suitable for girls with oily skin (they provide a mattifying effect) and makeup beginners: they are the easiest to apply.
1
Contouring with powder
© Makeup.ru
- The main rule to follow when using contouring powder is this: apply it after you are done with creamy textures.
- Before using contouring powder, be sure to powder your face with regular powder. Otherwise, the dry sculptor will “stick” to the foundation on the skin and spread in spots.
- Despite the fact that sculpting powder is ideal for oily skin, there are several nuances to consider when handling it. So, in the case of oily skin, the highlighter should be either matte or with a satin finish: the shining particles will look like oily glitter. We wrote more about how to use highlighter if you have oily skin here.
- If you feel like the powder looks too dark or heavy on your face, spritz your face with a refreshing mist.
2
Contouring with blush
© Makeup.ru
- If you need to highlight your cheekbones, it is better to choose blush in cool shades. If your own cheekbones stand out quite strongly and, on the contrary, the task is to “smooth out the corners,” warmer tones will suit you.
- How to determine the area where you should apply blush? It’s very simple: focus on your face shape. For girls with an oval face, it is enough to apply the product to the apples of the cheeks.
- If you have a long face, apply blush in horizontal lines (along the hairline in the center of the forehead, under the cheekbone and further towards the ears, spread a little on the chin), and if you have a round face, apply it in vertical lines.
© maybelline - The following scheme suits a rectangular face: blend the blush along the prominent parts of the cheekbones (or under the cheekbone) and along the jaw.
Virtual make-up with Maybelline New YorkView all services
3
Cream contouring
© Makeup.ru
Cream contouring is done using denser products, the most popular of which are contouring sticks, correctors, and foundations. Cream products are most suitable for dry skin, but today they also produce cream sculptors with a matte finish: they are ideal for oily skin. However, if you are still on the “you” level with makeup, it is better to give preference to powder: cream is more difficult to shade.
4
Pencil or stick for contouring
© nyxcosmetic.ru
- These two products have the densest consistency, so you should be especially careful when blending them. Otherwise, they will look unnatural on the skin. The easiest way to blend a pencil or stick is with a cosmetic sponge, but you can also do it with your fingers.
- Please note that thick cream products highlight skin imperfections and flaking, so they may not be suitable for problem skin.
5
Sculpting by proofreaders
© Makeup.ru
If you don’t have a special sculpting product on hand, for this purpose you can easily use a liquid concealer one or two shades lighter or, conversely, darker than your skin.
© maybelline
We recommend reading:
- Everything is clear: why do you need a contouring palette?
- 6 beauty tricks for discreet contouring
- Best Contouring Brushes
Expert advice
Follow the listed rules and you will get a neat and beautiful make-up.
- Shake off any excess powdery makeup from your brush or sponge. Adding the missing layer is much easier than blending the excess amount.
- Thick cream formulations are easier to use if you first warm them by squeezing or spreading them on your hand.
- The corrector strip on the cheekbones should not be placed close to the nose or chin. Maintain a distance equal to the width of two fingers.
- You need to choose an eyebrow shape that suits your type.
Makeup: how to do face sculpting for beginners, at home, step by step using photos and videos
How to choose a shade of sculpting product?
Like any foundation, you should choose a sculptor based primarily on the natural color of your skin. And also for what purpose you need it.
© nyxcosmetics
1
The shade of the light sculpting product that you will use to “highlight” this or that area should be a tone or two lighter than your skin, and the dark one should be a tone or two darker.
2
For the subzygomatic area, use a sculpting powder in the color of your own shadow: what shade is your shadow, ideally the sculpting powder should be the same.
3
If the sculpting powder is too dark, it will look like a dirty stain on the skin, so choose the lighter one between the two options.
4
The undertone of the sculpting product should match the undertone of your skin. Otherwise, what happens is that if your skin has a cool undertone and the sculpt contains warm orange pigments, it will look like dirt on the skin.
5
If you have pale skin, avoid using shades that are too dark or orange. Your ideal option is taupe.
6
For dark or tanned skin, you can use bronzer instead of powder. But make sure that it does not contain shiny particles - this will not be able to imitate a “shadow” on the face.
7
For very dark skin, a dark highlighter with reddish pigments is suitable, but in general it is better in this case to get by with just one highlighter.
Apply highlighter to those areas of the face where the light first falls: the top line of the cheekbones, the center of the face, the center of the chin, the bridge of the nose.
And, again, consider your skin undertone: if it is reddish or pinkish, a silver highlighter will suit you, and for olive skin, a golden one.
© maybelline
Face contouring for beginners step by step: photos and videos
In this video, a girl with a triangle shape shows the basics of contouring. Her face has many sharp angles: she tells how to soften them. Using specific products as examples, the blogger demonstrates the technique of applying makeup from scratch. She explains which cosmetics are best to choose and which brushes should be used.
Elena Krygina is one of the most popular beauty experts in the entire Internet space. Thousands of makeup artists and ordinary girls around the world listen to her advice. Because she competently and clearly explains all the intricacies of makeup. In this video, the girl tells how to do sculpting correctly. She shows, quote: “the average makeup of a star on the red carpet.” The video has already collected three million views, which means that it can be useful to you too!
Now you know how to properly contour your face. Don't be discouraged if something doesn't work out the first time. Makeup is a special type of painting. And in order to become a master, you need to make a lot of mistakes and get better at it.
Contouring Brushes
What kind of contouring brush should be and in what cases is it especially useful? Let's figure it out!
© nyxcosmetics
1
A soft fluffy brush (the kind usually used when applying blush) will come in handy when working on the sub-cheekbone area. Place a little bronzer or powder sculpting product on your brush, apply lightly to the skin and blend well.
© Makeup.ru
2
Cream or liquid textures are more convenient to distribute with a sponge, but in some cases a kabuki brush with a straight cut can be an excellent alternative. Apply the product using a tapping motion and do not forget to blend it properly.
3
Dry highlighter is most conveniently applied with a wide fan brush, which will ensure even application and a translucent layer.
© maybelline
© Makeup.ru
4
You can also distribute cream sculpting products using a flat synthetic bristle eyeshadow brush: this will ensure the most precise application. It is most convenient to “use” an eyeshadow brush with a slightly pointed tip.
© Makeup.ru
Contouring kits and palettes
In order to do proper contouring, a sculpting product of one shade is usually not enough. In addition, over the course of the year, the skin changes its shade, and the sculptor, who perfectly emphasized the cheekbones back in August, already looks too dark on the skin in September.
© maybelline
To simplify the task, beauty brands produce special contouring palettes with several shades at once, which are designed to solve different problems. In this case, the product can be either powdery or creamy.
The basic palette contains at least two shades: a dark sculptor, which helps create natural shadows on the skin and “sharpen” facial features, and a light highlighter, which can be used to highlight certain areas.
More “advanced” versions of the palettes (for example, Highlight & Contour Pro Palette, NYX Professional Makeup) contain eight different shades that can be mixed together to get the perfect color.
© Makeup.ru
If we are talking about a cream sculptor, then it can also be used instead of a corrector or concealer: there will probably be a suitable shade in the palette. Some palettes also include color blocks, which are useful for color correction of imperfections.
© nyxcosmetics
Wet correction
Foundation in a natural shade Correctors for light/dark shades on a liquid basis (palette).
The palette is a set of highlighters for professional contouring of facial contours and skin imperfections.
Concealer. Cosmetic product in the form of a pressed cream of a dark/light shade in the form of a pencil.
Liquid concealer foundation (“foundation”). Basic cream for darkening individual areas of the face.
Bronzer. Cosmetic product based on mineral components of light texture. It has a matte bronze or pearlescent shade with reflective particles. Used to darken skin.
A creamy pearlescent brightener. Highlighter is recommended to be used as a brightener for some areas of the face to give the appearance a fresh look; correction of shallow skin folds. It is not a concealer. Before choosing a contouring option, it is recommended to determine your face shape type.
A set of sponges and brushes of various diameters and sections.
Sponges for applying liquid bronzer
Ready-made schemes for contouring according to face shape
Each face type has its own unique scheme for applying contouring products. Choose yours and study the details. By the way, the most unexpected objects can help you when performing this technique - for example, ordinary tape!
Round face contouring
© Makeup.ru
The most important thing for girls with a round face is to highlight the sides of the face. Use only matte products.
1
Apply the sculptor two to three shades darker than your skin on the sides of the forehead and along the entire face. This action will help narrow it down a little visually.
2
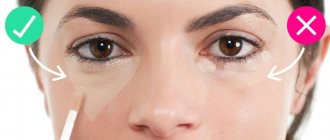
Apply highlighter without shimmer to the middle of the forehead and chin, under the eyes in the shape of an inverted triangle.
Oval face contouring
© Makeup.ru
A girl with this type of face should pay special attention to contouring in the cheekbone area.
1
Apply the dark sculptor under the cheekbones and blend.
2
Using the same dark sculptor, draw a strip along the hairline to visually narrow your forehead a little.
3
Apply highlighter to the center of the chin, the area above the cheekbones and along the temples to the eyebrows. Find a more detailed contouring diagram for an oval face here.
Contouring a square face
© Makeup.ru
For girls with a square face, the main thing is to soften its features.
1
To slightly narrow your forehead, apply the sculptor to the sides of your forehead.
2
Add some sculpting under the cheekbones. Start drawing a line from the ears and end in the middle of the cheek.
3
Apply highlighter to the middle of the chin and under the eyes (closer to the nose).
How to get rid of sagging cheeks at home
The following steps will help you cope with the problem of sagging cheeks:
- At least 1-2 times a week, massage the problem area with a special facial massager. Perform manipulations carefully so as not to damage the delicate skin. After the procedure, apply nourishing cream to your face.
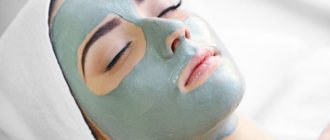
- Make masks with blue clay. The product saturates the skin with microelements, moisturizes, making the skin taut, firm, and elastic.
- Set up nutrition. If sagging cheeks are the result of excess weight gain, then first of all you need to get rid of it by adjusting your diet, engaging in physical activity, and giving up bad habits.
Contouring problem areas
It is not at all necessary to do “full” contouring if you need to solve some local problem: for example, narrow or widen your nose, enlarge your lips, emphasize your cheekbones.
Nose contouring
- To visually shorten your nose, apply a dark corrector to the very tip.
- A dark corrector will help to narrow your nose a little: apply it to the sides and blend well.
© Makeup.ru
The following trick will help you “lower” the upturned tip: draw a line across it as shown in the diagram below.
© Makeup.ru
- To make the “potato nose” more sophisticated, lighten the back of the nose with a highlighter, and apply a dark sculptor on the sides and wings of the nose.
© Makeup.ru
- If you have a hump on your nose, apply some dark sculptor directly onto it to make it less noticeable.
© Makeup.ru
For other techniques that will help you visually reduce your nose, watch our video:
Lip contouring
- To quickly plump up your lips, apply highlighter to the swoosh above your upper lip and centered under your chin.
- Outline your lips with a pencil in the color of the shadow - brownish: before the lipstick or directly on top of the lipstick. There they will look more voluminous.
© Makeup.ru
- To get lips like Angelina Jolie, draw a line with a dark pencil in the middle of the lower lip under it (try to create the effect that the lower lip is so voluminous that it even casts a shadow). Also, in the center of the lower lip, draw a perpendicular line with the same pencil - as if there is a small “hollow” on the lip. Apply lipstick or gloss on top.
© nyxcosmetics
Cheek contouring
Thanks to contouring, you can easily make your cheekbones more expressive. Draw a line in a dark tone from the top of the ear to the area just below the cheek. Remember that the color should fade.
© maybelline
Angle of youth what is it
Modern social networks, led by “beauty clinics” and fashion bloggers, have truly become trendsetters and beauty standards. Now girls and women have a new goal (after a small nose and voluminous lips) - a clear facial contour and a youthful angle. It really looks very nice, for example:
The photo was simply taken from Yandex.Images, and belongs to some cosmetology clinic. But you can literally create this effect for yourself by spending a little time.
So what are the standards for this angle of youth, how many degrees should it be? Let's figure it out.
The standards tell us that this angle should be approximately 100 -110 degrees:
This, from my point of view, is a very controversial angle size. It is most likely suitable for Europeans. But, for example, for Asian girls this angle is much larger, but it’s hard to call them less beautiful, right?
Therefore, our task is not to fight the natural shape of the skull and the position of the lower jaw, but to make the angle of youth CLEAR and stand out. Remove all sagging, tighten facial contours.