Paraffin is a mixture of hydrocarbons, a wax-like substance with a low melting point. It is obtained from oil and is widely used in industry, cosmetology and other industries. When melted, paraffin turns into a clear liquid. Candles are made from it and used as a lubricant in the manufacture of wooden furniture. Vaseline is made from paraffin, which is part of anti-corrosion coatings. It is also used in cosmetology for paraffin therapy procedures; it is even used to lubricate skis and bicycle chains. The scope of application of this substance is very wide and, most likely, paraffin products are found in every home.
Types of paraffin
Depending on the melting point, paraffins are divided into liquid, solid and microcrystalline. According to the degree of purification, they are divided into purified and unrefined. The former contain a large percentage of oil (up to 30% by weight), while the unrefined ones contain only 6%. The color of paraffin indicates the degree of its purification. White is refined, and yellow or brown is unrefined.
There are many ways to use paraffin at home: treatment and warming with it, cosmetic procedures, making candles and various other creative items. To carry out cosmetic procedures at home, you need to know how to melt paraffin at home.
Background of creation
Wax is considered one of the mass products in beekeeping, which is also actively used in agriculture. Bees accumulate wax during their life processes. Over time, the walls of the honeycomb begin to darken, the cells become smaller, and enough of this substance appears on the surface to be released.
By the darkness of the honeycomb, you can determine the quality of the wax and the presence of additional substances and elements inside. During the process of material release, the proportion of wax is minimal. Although it depends on how to dissolve the wax and what methods are used for this.
Pure beeswax can be obtained by melting down the wax-containing material and further filtering it. On an industrial scale, this is done quite easily thanks to special filters. In agriculture, such purification is carried out only by numerous meltings.
Several ways to melt paraffin
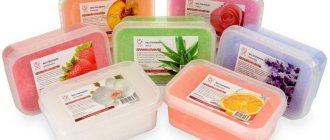
It is worth understanding that paraffin left over from burnt candles is not suitable for cosmetic procedures. For this purpose, special cosmetic paraffin is used. It can be purchased at pharmacies or specialty stores. Do you know how to melt paraffin? The easiest way is a water bath. To do this, you will need two metal containers of different diameters, water for heating and a thermometer. Stages:
- Pour about a third of water into a larger diameter container and boil it on the stove.
- Chop the paraffin into small pieces. It is most convenient to do this on newspaper or large format paper. When cutting, the paraffin will crumble. To do everything carefully and not lose the valuable substance, the litter will come in handy.
- Place the finely chopped paraffin in a container of smaller diameter and shake off the crumbs from the newspaper there.
- After the water boils, measure its temperature with a thermometer; it should show no more than 55 - 80 °C. At higher temperatures, the paraffin will begin to evaporate.
- Reduce the gas and place a smaller container on top of the boiling water so that its bottom touches the water.
- Stir the paraffin with a metal spoon until it completely melts.
- When melting, the volume of the substance in the container will decrease. If it is not enough, you can add a few more pieces to the already melted paraffin.
Make sure the container is completely dry before melting the paraffin. Water ingress into liquid paraffin is strictly prohibited. When it comes into contact with water, the hot mass will shoot and splash, and contact with the skin may cause a burn.
Which is the best anti-rain product to buy?
The best anti-rain for car glass
- Turtle Wax ClearVue Rain Repellent. Manufacturer: Turtle Wax Ltd., UK (another “folk” name for this product is “turtle”). ...
- Aquapel. ...
- Hi-Gear Rain Guard. ...
- Liqui Moly Fix-Klar Regen-Abweiser. ...
- K2 Vizio Plus. ...
- Lavr. ...
- Mannol Antiaqua regen-abweiser. ...
- Abro Clear View.
Interesting materials:
How to connect an iPhone to a canon printer? How to connect an iPhone to a TV? How to connect an iPhone to a TV via Smart View? How to connect an iPhone to a Kiwi TV? How to connect an iPhone to a Samsung TV via Smart View? How to connect an iPhone to the center? How to connect iPhone headphones to Android? How to connect IQOS to iPhone? How to connect an iPad via smartshare to LGI? How to connect an iPad to a monitor?
Can paraffin be melted in a microwave or oven?
Now let's find out other nuances of this process. So, many, in search of an answer to the question of how to melt paraffin at home, think about the possibility of doing it in a microwave or oven. Indeed, it is possible to do this.
In the first case, you should set the defrost mode and melt the paraffin for 2-3 minutes, after crushing it. Be sure to cover the paraffin container with a lid and use microwave-safe containers.
In the oven, paraffin can be melted at a temperature of 70-80 ° C. Be extremely careful when removing a container of melted material. Allow the mixture to cool slightly to avoid burns if the hot liquid comes into contact with your skin.
How to make a 10 percent saline solution at home. Frequency and technique of rinsing
The dosage and number of manipulations are selected individually, since it depends on the problem that needs to be solved. During the cold season, two to three washes per week will be sufficient for preventive purposes. For acute infections - up to four times a day for one to two weeks. For hygienic purposes - every morning. People with chronic infections can cleanse regularly.
First, decide which tool is best for you: a special watering can, a rubber bulb, a teapot with a thin spout, or a regular syringe without a needle.
These instruments cannot be used for newborns and small children, since any of them can easily damage the nasal mucosa.
Technique for rinsing the nasal passages in adults:
- choose a device in advance and prepare a solution at the desired temperature; fill the device with medicine;
- tilt your head to the right. Slowly pour the remedy into the left nostril, while it will flow out of the right nostril. Some of it will end up in the oral cavity, it’s not scary, you just need to spit it out;
- do the same with the right nostril, turning your head to the left. It does not matter which nasal passage you rinse first. The main principle: the head is tilted to one side, and the nostril is washed from the opposite side.
For maximum therapeutic effect, you need not only to carry out the procedure correctly, but also to follow a certain regime after it.
For some time after the manipulation, the remedy remains on the nasal mucosa. Therefore, you should not go out into the fresh air for two to three hours in the cold season, or for an hour in the summer.
You can scoop the solution into your palms, drawing it in first through one nostril, then through the other. For many people, this is the only way to conveniently perform this procedure. However, it must be taken into account that with this method the angle of inclination of the head must be sufficient so that the product gets into all the sinuses. Using your palms, it is quite difficult to control this. If all the sinuses are not washed out, then there will be no noticeable effect from such treatment.
You can use the “adult” method for children starting from the age of five, but only under the supervision of their parents. Treatment of young children is fundamentally different from treatment of adults.
Technique for rinsing the nasal passages in young children:
- Prepare everything you need, lay the baby on his back;
- clean dried crusts using a cotton swab and petroleum jelly;
- drop 1-2 drops of solution into each passage;
- wait a few minutes and suction using a pharmacy aspirator or a small rubber syringe;
- at the end, wipe the nose with a cotton swab;
- a child who can already sit needs to drop the medicine into the nose with a pipette, and then sit him down and make sure that the remaining medicine flows out of the nose.
If your nose is very stuffy, then drip it with vasoconstrictor drops within 10-15 minutes. This applies to both children and adults.
Rinsing the nasal sinuses with salt water is not done before bed, before meals, or before going outside. After eating, at least two hours should pass. You can go out into the fresh air every two hours in winter and half an hour in summer.
Now you know how to make saline nasal rinse. If everything is done according to the instructions, then with the help of this simple recipe and simple procedure you can very quickly say goodbye to a cold.
We take salt for granted as a necessary seasoning for dishes.
Meanwhile, this substance, important in cooking, is a healer, a magical protector and an assistant in the household.
For treatment, salt is often used in dissolved form. The methods have a number of nuances that you definitely need to know about. For example, how do you make a 10 percent saline solution if you don’t have chemical measuring spoons or beakers at home? How much salt and water should I take? Let's look at simple options for preparing medicinal solutions.
Paraffin therapy is a great way to take care of the skin of your hands and face in winter
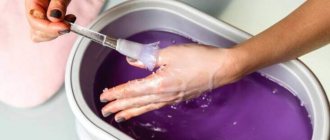
The use of hot paraffin is widely used in cosmetology. These treatments make the skin velvety and smooth and are a good way to restore its elasticity. You already know how to melt paraffin in a water bath, and in beauty salons they use special melting baths for this. To carry out one procedure, you need to melt half a kilo of paraffin. This process looks like this:
- Before melting the paraffin and starting to create a mask for your hands, wash them well and lubricate them with moisturizer. The principle of operation of a paraffin mask is that it warms up the skin of the hands, opens pores and improves blood circulation, allowing the upper layers of the epidermis to absorb the beneficial components of creams better than usual.
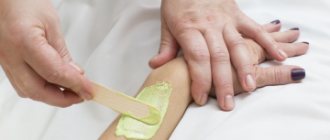
- Dip your hands into liquid paraffin that has cooled to a tolerable temperature, completely straightening your fingers so that the liquid covers the entire skin of your hands. Repeat the procedure several times, allowing the paraffin to harden a little after each time you put your hands in the container. Thus, a layer of paraffin will appear on the brushes, completely enveloping them.
- After this, hands with warm paraffin should be wrapped in cling film, polyethylene, or put on plastic gloves. Wrap your hands in a terry towel over your gloves and keep it there for about 20 minutes.
- After 20 minutes, you can remove the paraffin from your hands and apply a nourishing cream.
As mentioned above, for this procedure it is necessary to use special cosmetic paraffin. It is strictly contraindicated to make these baths from yellow, unrefined paraffin. It contains substances that have a harmful effect on the skin. Using a cosmetic substance, you can be sure that you will not harm your hands. In addition, it is often produced with the addition of various essential oils and nutritional components.
Enameled tank
This method will require 2 enamel tanks, each with a volume of up to 20 liters. Naturally, this option is used in cases where it is necessary to process a large amount of raw materials.
So the component is folded into one tank and a layer of gauze is laid on top. Water is poured into the second tank. When it starts to boil, a tank with bee product is placed in it. From above, everything is covered with high-density material for reliability. In this state, everything is on fire for about 2 hours.
Then the structure, which is no longer heated, is left to cool overnight. The next day you can remove the melted wax from it.
The effect of paraffin therapy
The described hand baths and face masks have a complex therapeutic effect on the skin and joints. Paraffin therapy is recommended in the presence of peeling and microcracks on the skin, pigmentation, frostbite, arthritis and arthrosis. This procedure also has a targeted restorative effect on the nail plate; if the nails are peeling or often break, paraffin therapy is perfect for restoring their structure.
Contraindications
Procedures with hot paraffin are not recommended in the following cases:
- for open wounds on the skin of the hands and face;
- purulent inflammation;
- fungal diseases and eczema;
- diabetes;
- vascular diseases;
- asthma.
The beneficial qualities of paraffin do not end there. It is often used for home heating for bronchitis and common colds. Here it is also important to use a special cosmetic substance, which can be purchased in pharmacies or specialty stores.
Common Mistakes
Sometimes the following mistakes are made:
- I don’t keep it in a heated state for long enough, which leads to incomplete melting of the substance.
- When using wax melters, you need to know exactly which one is suitable for processing. It can be diluted in turpentine, hydrogen sulfide, gasoline, alcohol, and chloroform. These substances are good solvents. But to dilute with alcohol, you cannot bring it to a boil. But in this method it is important to be careful and accurate.