At first, many readers may ask the question: “Why do you need a self-tanner?” After all, there is the sun, relaxing in which you can achieve a beautiful, even skin color. This judgment is partly correct. But there are times when people cannot stay in the sun for a long time, but still want a beautiful tan. In such cases, self-tanning is what you need.
This product is somewhat capricious, so you need to know how to apply it correctly. Otherwise, you can get an uneven, unattractive tan, and no one wants that. After all, no one wants to be striped.
How to properly apply self-tanner to your body
When it is not possible to go to the beach and get a natural tan, or if you have fair, delicate skin and get sunburned, self-tanning comes to the rescue. The variety of products on the cosmetic services market allows you to choose the tone that suits your skin type.
Instant tanning compounds come in different shapes, textures, and consistencies. Let's look at the distinctive features of the most common means:
- Self-tanning cream is suitable for beginners. It lasts a long time, but application takes a long time. Due to the sufficient fat content, apply a thin layer and absorb for at least half an hour.
- The gel applies evenly and is used while showering. It does not stain clothes or clog pores, but it is impossible to achieve intense color. Not suitable for dry skin.
- Self-tanning milk moisturizes and has a light structure. After application to the body, the face appears instantly. Does not dry out the epidermis, nourishes, smells good, but the result lasts until the first bath or shower.
- Mousse is needed to correct coloring. Its consistency is average between cream and milk, non-sticky. Absorbs, dries quickly and moisturizes the skin well.
- Wipes are used mainly to refresh the complexion. You won't be able to tint your entire body.
- The lotion has a runny consistency. Moisturizes and nourishes the dermis. It is recommended to apply daily to maintain results.
- The oil is used on dry skin. The disadvantage is the greasy shine and film formation.
- The spray compares favorably with other forms by saving time spent on application and absorption. The product not only gives a lasting tan, but also cares for the skin.
Beginner users are usually interested in how to apply self-tanning at home so that there are no spots or streaks. The procedure is carried out in several steps.
- Step 1. Softening. The use of auto-bronzant requires preparatory measures. If you have rough, dry skin on your elbows, knees, and shins, then a week before the procedure, if possible, lubricate these areas several times a day with a nourishing, moisturizing cream.
- Step 2 . Depilation. The procedure is necessary to avoid spotting in hair growth areas. They must be removed a day or two before using the product. A reserve of time is needed to restore the skin.
We advise you to read: How to properly depilate legs at home
- Step 3 . Deep cleaning. In addition to taking a shower using a hard washcloth and pumice stone, sugar or coffee scrubbing of the body and face is performed. You can purchase the product in a store or make it yourself. To do this, take equal parts sugar or coffee grounds and vegetable oil and mix. You can use a mixture of honey and soda. The composition is applied to the body with light circular movements, paying more attention to problem areas with a thick keratinized layer.
We advise you to read: Coffee body scrub at home: recipes
- Step 4 . Hydration. After 5 minutes, take a shower, after drying, apply a light nourishing product (mousse, milk, gel), which is quickly absorbed and does not leave a greasy residue. After cleansing and nourishing, the skin becomes smooth, elastic, prepared for the application of color without streaks.
- Step 5 . Checking the product for allergen content. At least 12 hours before the procedure, an allergy test is performed by applying auto-bronzant to the bend of the elbow or the back of the neck and monitoring the reaction of the dermis. If redness, burning, or itching appears, then you need to change your self-tanner to a hypoallergenic one. The test will also show whether the shade suits your skin.
- Step 6: Using self-tanning formula. Spray is the most popular skin toning product. But not everyone knows how to properly apply spray tanning.
To obtain a uniform tone, the contents of the can are sprayed in a circle, rubbed with a gloved hand or a cloth. The procedure begins with the shoulders, moving to the décolleté and arms. Then apply the product to the buttocks, then to the stomach, then to the legs from the hips to the feet. The face is treated last. This procedure is close to natural tanning. The whole process takes 40-50 minutes.
Treating the skin with self-tanning cream takes about two hours. If you are afraid that the tone will be more intense than you want, the product is mixed in equal parts with moisturizer. This technique is most often used for the face.
Quick movements and careful rubbing of a thin layer of cream on each area help to apply self-tanning evenly. Do not forget about the folds of the skin, otherwise streaks cannot be avoided. The dermis must be prepared and dry, as drops of water will not provide an even, stain-free result.
If the tone turns out lighter than desired, then repeat the procedure after an hour. Before use, read the instructions and follow the recommendations.
We also recommend reading: Tanning at home - the best recipes
Salon tanning
Those who do not want to bother with auto-bronzants themselves can resort to the salon tanning procedure. Its convenience lies in the speed of application - just a couple of minutes is enough, and you will get the desired bronze shade. Before the procedure, you will be exfoliated, and the spray system will ensure an even application of self-tanning, leaving no spots or streaks. Tanning shades vary: mountain, sea, tropical - to suit your taste. In addition, salon products are devoid of the specific smell of cosmetics, which some may find unpleasant.
How to apply self-tanning to your skin
Instant tanning product is applied to the skin:
- by hand (without or wearing gloves);
- napkins;
- sponge;
- with a brush.
The sponge is used when applying self-tanning to the face. A brush is needed to treat hard-to-reach places. The tan will be more even if these tools are pre-moistened. They use their hands more often. Those who do not want to wash paint off for a long time are recommended to wear thin, tight-fitting rubber gloves.
To adjust the tone, special wipes are used that eliminate defects both on the face and on other small areas of the dermis.
pros
These funds have many positive aspects:
- it is quite easy to use yourself at home;
- great for fair skin;
- it doesn’t take a lot of time or money to get results;
- can be used in any season;
- unlike sunlight, it does not cause harm and is safe;
- the result of using the products is a beautiful tan and well-groomed skin;
- can be applied to areas of skin that are open;
Features of application to different areas of the skin
In order for the self-tanner to last a long time and lay down evenly, you need to know how to properly apply self-tanning to the face, body, hands, and other parts of the body.
Before starting the procedure, lubricate the elbows, knees, ankles and the outer surface of the shin with cream, and treat with coloring agent last. This will prevent the appearance of a more intense tone against the background of other areas. The color algorithm varies. Some people prefer to start from the shoulders, gradually moving down to the legs, while others, on the contrary, start from the feet, moving up to the stomach, chest, back and neck.
Self-tanning does not have to be applied to the entire body. Sometimes it is enough to paint individual areas of the skin.
Application to face
Choose auto-bronzants made specifically for the face; they are more gentle and soft.
The following tips will help you apply self-tanning to your face:
- Step 1. Wash off dirt and decorative cosmetics. Use a scrub.
- Step 2. Apply moisturizer to dry skin, wait time for absorption.
- Step 3. Pin your hair up high and tuck it under a cap.
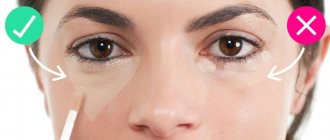
- Step 4. Squeeze a small amount of self-tanner onto the sponge, starting from the neck, moving to the area behind the ears and lastly to the face. Try to apply the coloring composition along the skin lines from the center to the edges so as not to stretch the dermis. The hair growth line is retouched using an everyday cream. Treat the areas between the cheeks and ears, chin and beginning of the neck more thoroughly. Avoid getting the product on the area around the eyes, as, gradually spreading, the auto-bronzant can get on the mucous membrane, causing a burn.
We advise you to read: Bronzers for the face: what they are, how to use them correctly
Before you decide to tint your face with a synthetic composition for external use, think twice. You cannot be sure that flaws will be hidden and not emphasized. The effect may be unpredictable.
It is especially not recommended to use coloring products for owners of enlarged pores. The paint, getting into them, will look like dark dots on a general, lighter background.
Sometimes it makes more sense to use foundation, pencil, or powder.
Application to feet
The following algorithm will tell you how to apply self-tanning on your legs:
- Step 1. Cleanse, epilate, scrub.
- Step 2: Use moisturizer, apply a thicker layer to areas with rough and thick skin.
- Step 3. After half an hour, when the legs are smooth, clean and moisturized, start covering the dermis with self-tanning product. Starting from the feet, move from bottom to top. Apply a thin layer of the composition, rub in circular massage movements. Limit the amount of self-tanning on your knees, and treat the area of your ankles and between your toes more thoroughly so that blemishes do not appear later.
- Step 4. Give the composition time to absorb.
Other parts of the body, hands, are painted similarly. Difficulties arise when it comes to the back. If you don't have an assistant, apply self-tanner yourself. To do this, you will need two large mirrors installed so that your back is visible, a long sponge holder or a wide brush. A sufficient amount of self-tanning is quickly distributed over the entire back area. Clothes should not be put on until after 6–8 hours.
The bikini area above the line of underwear, nipples and areola of the mammary glands, lips, skin around the eyes, and axillary areas cannot be treated with self-tanning. Does not stain palms or soles of feet. During lactation, do not use the product in the breast area.
Contraindications
It is strictly forbidden to use any self-tanning products when:
- skin cancer;
- any damage to the dermis;
- foci of inflammation on the epidermis;
- extensive rashes of a pustular nature;
- infectious dermatological diseases.
Acne is one of the contraindications to the use of self-tanning.
Actions after applying self-tanner
Immediately after the procedure, wash your hands with detergent. To prevent the nail plates from turning yellow, before covering the skin with a coloring composition, apply varnish, which is then removed.
After applying auto-bronzant, it is not recommended to perform the following actions:
- get dressed, go to bed until completely absorbed (about an hour);
- wear tight, tight-fitting clothes, the seams of which leave streaks;
- take a shower, apply skincare products, perfume, deodorant for the first 12 hours, when the self-tanning continues to develop;
- use washcloths and scrub;
- visit baths, saunas;
- engage in physical activity that increases sweating.
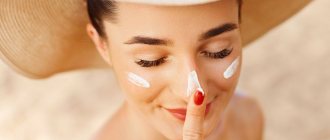
In the following days, the skin is moisturized, and before going outside, they use creams and sprays that protect against ultraviolet radiation, since self-tanning does not have such properties. Don't be alarmed by brown water after your first shower. The necessary part of the composition has already been absorbed; removing the excess will not affect the result.
How long does self-tanning last and how often can it be applied?
The product, which appears on the skin as a golden, chocolate or bronze tint, lasts on average 3-10 days. The preservation of color is influenced by the rate of renewal of cells in the upper stratum corneum, the frequency of water procedures, the quality of preliminary preparation and the composition itself.
The answer to the question of how often you can apply self-tanning depends on the individual characteristics of your skin.
To maintain a uniform tone, auto-bronzant is used every three days, provided that it is of high quality, with a current shelf life, and purchased from a reliable, trusted seller.
Tinting compounds are considered safe, but they are still synthetic and contain alcohol. Therefore, it is not recommended to get too carried away with them, especially for people with dry dermis.
Advantages
Self-tanning has the following significant advantages:
- You don't need to go to the beach or solarium to get a beautiful, even tan.
- The color appears on the body within 4 hours after application.
- Absorbs quickly without clogging pores.
- Stays on the skin from 3 days to two weeks. It all depends on the manufacturer.
- Self-tanning hides minor skin imperfections and makes the body visually slimmer. Some manufacturers offer creams with vitamins and minerals that nourish and restore the skin.
How to remove self-tanner
If you are disappointed with the effect obtained, or want to get rid of an unsuccessful tone, the following remedies will help at home:
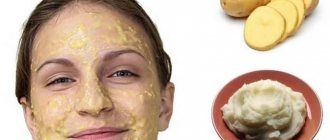
- Shower, washcloth, scrub. To quickly remove the top layer of horn cells, you need to shower as often as possible using a hard washcloth or brush and exfoliating agents. If self-tanning is expensive and branded, then such measures will be invalid.
- Lemon juice. With a moistened napkin, wipe different parts of the body with the same pressure an equal number of times. The tan tone becomes lighter after the first application.
- Vinegar 6 percent. Make a solution from 100 ml of 6% vinegar, 500 ml of water and 30 g of vegetable oil. Rubdowns are done twice a day: in the morning and before bedtime.
- Ethanol. Use in the same way in several steps. After the procedure, take a warm shower with a washcloth and moisturize the epidermis with cream. This method is not suitable for women with sensitive skin due to possible burns.
- Milk for removing decorative cosmetics. Used for particularly sensitive skin. There is an effect, but it is weak.
- Hydrogen peroxide 3 percent. The product is diluted in half with water, a cotton pad or napkin is moistened, and the skin is treated. After waiting 4-7 minutes, wash off and moisturize.
- Baths with whitening herbs. Parsley, chamomile flowers, yarrow, bearberry, and licorice are suitable for the decoction. Take a bath for at least half an hour, after which you use a scrub.
To whiten palms that become intensely colored during application, use lemon baths or nail polish remover. Then wash your hands with soap and moisturize.
We advise you to read: Instant tanning - what it is, how it is done, contraindications