In this article you will learn gymnastics exercises for the face (face building), with which you can remove nasolabial folds
. But first, we'll look at what nasolabial lips are and how they appear on our faces.
A short theoretical introduction is necessary so that during face-building exercises you do not just mechanically perform movements, but clearly understand how exactly all the practices work at a deep level. This approach will make your training as effective and safe as possible.
So, how do nasolabial folds appear?
Causes of nasolabial folds
In fact, we are born with nasolabial lips. This is our physiological feature. Surprised? – Then look at the faces of little children – and you will see their nasolabial folds.
And with age, the nasolabial lips deepen
.
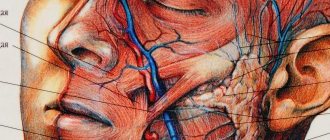
This happens at the site of the so-called muscle suture
, where many facial muscles connect, which are involved in various facial reactions.
Stages of formation of nasolabial lips
Stage one. First of all, the nasolabial lips begin to deepen near the nostrils. The muscle that raises the upper lip and dilates the nostrils is involved in this. For various reasons, which I wrote about in more detail in the previous article, this muscle spasms, decreases in size and shifts the position of the muscle suture upward and slightly diagonally. But the skin does not have such an ability to contract, so in this area it becomes “superfluous”. As a result, the skin and soft tissues begin to hang over the muscle suture, deepening the nasolabial fold.
Stage two. After this, the nasolabial fold may fall lower. In this case, the zygomatic muscles come into an overstrained state - and the nasolabial cavity deepens in the central part - between the wings of the nose and the corners of the lips.
Stage three. The final stage of deepening the nasolabial folds involves the cheek muscles, as well as the triangular muscles, which are located under the corners of the lips. When these muscles become overstrained, they visually deepen the nasolabial fold opposite the corners of the lips and below, in addition forming the so-called “fold of grief.”
Factors that further deepen nasolabial folds
Lymph stagnation and swelling. First, it is necessary to understand that the skin receives nutrition through blood, which is delivered through blood vessels and capillaries. And the skin is cleansed through lymph, which is drained through lymphatic vessels and capillaries.
Most of these vessels and capillaries (both blood and lymphatic) first pass through the muscles. And when muscles are chronically overstrained or spasmed, blood vessels and capillaries become pinched. As a result, blood circulation and lymphatic drainage are disrupted. The skin does not receive enough nutrition and oxygen and, as a result, begins to cleanse itself poorly.
The lymphatic system cannot cope with removing excess fluid, mucus and toxins. And as a result, such stagnant fluid begins to accumulate in the cheek area, enhancing the effect of nasolabial swelling. You can read more about muscles and the deterioration of the circulatory and lymphatic systems here.
Fat deposits. With age, subcutaneous fatty tissue tends to concentrate closer to the center of the face and, obeying the law of gravity, sag downward along with the skin, also deepening the nasolabial folds.
Anatomical features
Nasolabial folds are longitudinal grooves located from the wings of the nose to the corners of the mouth. They belong to the deep type of wrinkles and appear quite early. In youth, due to the elasticity of the skin, folds are invisible. But with the loss of elasticity, creases begin to actively appear. A whole group of muscles is responsible for the formation of nasolabial folds. These are the wing parts of the nose and upper lip, the major, zygomatic, buccal, and triangular muscles.
The degree of severity is not always a consequence of age-related processes. A great dependence can be seen in facial movements, as well as in the emotionality of facial expressions. The final formation of nasolabial folds occurs by 30–35 years.
Causes of premature wrinkles:
- bad habits, smoking, alcohol;
- sudden changes in weight - weight loss;
- pathology of the skull bones;
- heredity;
- rachiocampsis;
- lack or insufficient cosmetic care;
- malocclusion.
How to remove nasolabial folds?
Now that you know the reasons for nasolabial folds , I think you already have a rough idea of what you need to do to remove nasolabial folds:
- With the help of facial gymnastics exercises, it is necessary to “revive” overstrained facial muscles in order to warm them up and pump blood and lymph with their help in the central part of the face. This will increase blood circulation and lymphatic drainage, the skin will receive nourishment, will be able to cleanse itself, swelling will gradually go away, and the nasolabial folds will soften.
- Then you need to relax and stretch these muscles to return them to their natural shape. This way they will stretch to their natural state - and the nasolabial folds will gradually smooth out.
- Using massage techniques, it is necessary to “disperse” swelling in the cheek area, as well as further relax and stretch the facial muscles.
Safety regulations
If technology is violated, it is often possible to do the opposite - to accelerate the aging process. Therefore, you should follow the basic recommendations to restore the elasticity and smoothness of the integument.
Safety precautions:
- The face and hands must be clean.
- The mirror is installed at face level so as not to tilt the body.
- Alternate each muscle tension with relaxation.
- Before performing facial gymnastics, the room should be ventilated to improve blood flow and oxygen supply.
Exercises for nasolabial folds
Let's get to practice! Below you will learn techniques for facial gymnastics (face building) to soften nasolabial folds.
If you have already taken my Free Facial Gymnastics Video Course, these exercises will be a great addition to the practices you have already learned.
Warming up
Before performing face-building exercises, let's warm up the facial muscles. We inhale through our nose, suck in our cheeks, as we exhale, fill our cheeks with air and blow it out through our lips, folded into a tube.
We repeat this movement 15-20 times. After this, the muscles in the area of the nasolabial folds are ready to work!
Exercise for nasolabial folds No. 1
In this exercise we will work with the muscle that is involved in raising the upper lip, widening the nostrils and primarily deepens the nasolabial folds.
Technique for performing exercise No. 1:
- Raise the upper lip, exposing the upper teeth, and lower it. At the same time, the lower jaw is lowered very gently down.
- In order for this exercise to be as safe as possible and to prevent creases and wrinkles from forming in your cheeks and eyes, cover your cheeks and nasolabial lips with your palms up to the cheek bones. Your task is to use your palms to fix all the places where creases may form.
- During the exercise, the eyes, eyebrows and forehead remain relaxed.
So, dynamically, we perform this exercise from the nasolabial folds ten to twenty times.
After this, we begin to connect the static delay. We move the upper lip upward as much as possible and linger in this position for five seconds.
Repeat the static hold for five seconds from five to fifteen times, depending on the readiness of your muscles. You will feel a slight trembling in the muscles, slight tension in the muscles, you may feel a slight numbness, heat or warmth. This will be a signal for you that you have worked your muscles in this exercise and it’s time to relax.
Relaxation. Additionally, let’s relax the muscle that was involved in strength work. We place our index fingers vertically to the right and left of the nose, gently press them in and begin to move our fingers up and down together with the skin and muscles.
Do this up to twenty times, then release the pressure a little and move your fingers along the surface of the skin, rubbing the skin up and down.
Exercise for nasolabial folds No. 2
In this face-building practice, we will work on the zygomatic muscles, which are secondarily included in the deepening of the nasolabial folds. In this exercise, in addition to the zygomatic muscles, we will also involve the orbicularis oris muscle.
Technique for performing exercise No. 2:
- We move the lower jaw down.
- We stretch the upper lip over the upper teeth.
- Gently spread the corners of the lips apart and from this position we will push the corners of the lips towards the very top of the ears.
- In order to ensure safety during this exercise, as well as to strengthen the work of the zygomatic muscles, we will again need our fingers and palms. We cover the nasolabial lips, cheeks and cheek bones with our palms. This can be done with the fingers, this can be done with the central part of the palms, this can be done with the base of the palms. Your task is to ensure that the skin under your palms is as smooth as possible.
- Now that our palms have fixed the skin in the area of the necks and around them, we begin to move the corners of the lips, shifting them to the top of the ears.
Perform this exercise first dynamically ten to twenty times, and then go static and hold each stretch for five seconds.
Please note: if in this exercise your nasolabial folds deepen during the movement itself, pull your upper lip harder over your upper teeth and lower your lower jaw a little lower.
Your task is to feel the corners of your lips during this exercise and feel how your zygomatic muscles gradually come into play. This feeling may not come at first, it requires a little training, and therefore, by regularly performing this face-building exercise, you will be able to feel the work in the zygomatic muscles. Even if you don’t feel it yet, they get to work anyway.
Perform the dynamic part ten to twenty times, then move on to the static part. Perform the static part from three to ten times, depending on the capabilities of your muscles. After this, rest and, if you have a desire and your muscles require it, do another repetition of this exercise: dynamically and statically.
Exercise for nasolabial folds No. 3
And one more gymnastics exercise for the face. It will help us engage the cheek muscles. These are precisely the muscles that are involved in deepening the nasolabial lips, so to speak, in the last place.
Technique for performing exercise No. 3:
- Relax the upper part of the face: eyes, eyebrows and forehead.
- It is better to rest the elbows of both hands on the table or on your knees.
- Place your palms on your lips and cheeks.
- Then we take a breath, fill our cheeks with air and begin to resist: we press our palms on our cheeks, and with the air inside our cheeks we apply pressure on our palms. You should feel the main pressure in the cheek area.
This face-building exercise can be performed dynamically or done immediately with a slight delay: hold the maximum pressure of your palms on your cheeks and cheeks on your palms from five seconds to thirty seconds. Choose the option that is more comfortable for you. You can do one or two sets of this exercise.
Prevention
The muscle fibers of the nasolabial triangle are actively involved in articulation and facial expressions. It is impossible to keep a still face; this will not affect the elasticity of the muscle fibers. You should follow simple recommendations to prevent the formation of creases.
Preventive measures against nasolabial wrinkles:
- watch your facial expression, do not purse your lips;
- sleep on an orthopedic pillow in a supine position;
- maintain hydrobalance, drink at least 1.5–2 liters per day;
- smile more, this will avoid shifting of the cheeks and the appearance of jowls;
- use high-quality cosmetics; the stages of cleansing, toning, and moisturizing are required;
- a full 8-hour sleep will help maintain a fresh, youthful face;
- after 30 years, use lifting programs - masks, peelings, hardware procedures;
- eliminate bad habits;
- use sunscreen, the SPF factor should be appropriate for the season.
Folds in the area of the nasolabial triangle visually make the face older. It is possible to restore the firmness and elasticity of the skin not only in aesthetic medicine clinics. The effective complex is easy to perform at home, stopping the aging process.
Relaxation, self-massage and nasolabial traction
After the power complex of gymnastics for the face, we move on to the stage of stretching the worked muscles and relaxing them more deeply.
Relaxation technique #1
We will now fill our cheeks with air and roll it from one cheek to the opposite. First, we do this dynamically from five to twenty times. And we add static: we take air into one cheek, stay in this position for five to ten seconds and then do the same on the opposite side.
Massage of nasolabial folds No. 1
In order to work the muscles even more, you can, at the moment when your cheeks are filled with air, press and massage the area of the nasolabial folds with your finger.
Relaxation technique No. 2
We pump air under the upper lip, under the lower lip, under one corner of the lips, under the second, over the first and second corners, under the corners of the lips and then roll the air in a circle in one direction and in the opposite direction.
Pay attention to this exercise for up to one minute. If it is more difficult for you to pump air into one of the zones, this means that it is this zone that is more tense; the muscles are in greater change here. Pay more attention to this area, relaxing it.
Massage of nasolabial folds No. 2
Well, let’s finish our work with the area of the nasolabial folds with a massage, which will very well help stretch and relax the muscles.
Place your thumbs under the nasolabial folds and place your index fingers on top. Then gently massage the muscles, knead them and stretch them.
Try to get your fingers as deep as you can. Feel where your most tense areas are and pay more attention to them.
You can continue this massage, covering not only the nasolabial area, but also working with the cheeks, upper lip, lower lip, and corners of the lips.
Japanese technology
Shiatsu is a special manipulation technique that has been used by Japanese ladies for a long time, and has only recently begun to be used in home cosmetology around the world. There are no particular difficulties, so every woman can cope with the process. The results of regular procedures are the rapid smoothing of wrinkles.
Carrying out the procedure:
- Place the tips of your index fingers and thumbs together and tap the grooves with smooth movements, moving from bottom to top, then in the opposite direction.
- Gently stretch the skin of the face with stroking, making sure that wrinkles disappear as much as possible.
- You need to stroke areas of the skin with your mouth, moving your fingertips from the middle of the upper lip to the corners.
Important! Repeat each stage for 30 seconds; exceeding this time is not recommended. You can start with short sessions, making sure that no painful sensations appear.
Recommendations for performing the complex
Perform this complex no more than once every two days.
: trained for a day - rested for a day - trained for a day - rested for a day.
Under no circumstances do strength exercises every day!
This can increase the spasm of those muscles that are already in an overstrained state. After a power load, it is very important for our muscles to rest and recover properly.
You can practice relaxation techniques every day. Some even several times a day, for example, rolling air from cheek to cheek, from nasolabial to nasolabial, and rolling air around the lips.
I highly recommend adding lip exercises to the complex for nasolabial folds. You can find these exercises in my Free video course on facial gymnastics. In addition to these exercises, in the Free video course you will find exercises for rejuvenating six areas of the face
.
And here you can see the results of women who did facial gymnastics using my method.
I wish you pleasant training and beautiful results!
I wish you to remain young and beautiful at any age!
Yulia Kovaleva, your facial gymnastics instructor
Rules
There are several types of massage that can treat or prevent the appearance of nasolabial wrinkles. It is not necessary to use everything at the same time - it is better to alternate techniques. This approach will allow you to achieve effective results, but for this you will need to strictly adhere to some rules.
Basic requirements for the procedure:
- manipulations must be regular;
- find out contraindications and, if there are prohibitions, abandon this method of getting rid of grooves;
- start procedures no earlier than 25 years of age;
- do not use force, movements are confident and clear;
- If you experience pain or discomfort, stop the massage immediately;
- take a break if the skin has cracks, wounds, or inflammatory processes occur.
If you have any doubts about how to perform a massage, be sure to consult a cosmetologist. Only a specialist will determine which method to choose for the greatest effect.
Ice cube massage
Using ice cubes during procedures is an effective way to get rid of wrinkles. The skin will tighten significantly, grooves will disappear, even enlarged pores will become invisible. It is better to use clean, settled water, but if you have time, prepare ice with the addition of parsley juice, which has the property of rejuvenating the skin.
Carrying out the procedure:
- Warm up the skin, use a clean soft cloth soaked in hot water, place it on the face, leave until it cools.
- Pass the ice cube along the nasolabial furrows from bottom to top, in the opposite direction.
- Using an ice cube, smooth the skin, from the furrows to the temples.
- Stroking in the opposite direction - from the temples to the very corners of the lips.
- Repeat all movements at least 5–7 times.
You can prepare cubes in advance from herbal decoctions of chamomile, string, and sage. They are able to relieve irritation, replenish the lack of certain elements in the dermal tissues, and have a general rejuvenating effect. It’s easy to prepare the decoction: pour the plant material (20 g) with boiling water (200 ml), leave to brew for half an hour under the lid. Carry out filtration using several layers of gauze fabric. Pour the resulting product into ice molds and place in the freezer.